
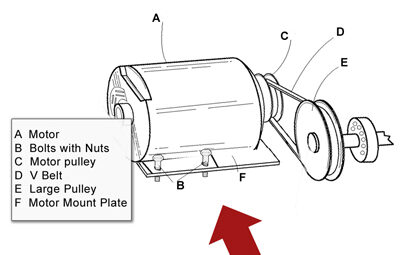
Motor, Pulley & Belt
Before installing the motor you will need to bring the machine to the upright position. It is highly recommended that you seek assistance for this step. Although the machine is not very heavy, it can be awkward to bring upright by yourself.
You will also be installing the lock washers in this step. They are not mentioned in the video.
1. Loosen 4 bolts (B) just enough to allow the motor to move side to side.
2. Ensure that pulleys (C & E) are properly aligned.
3. Slide motor (A) to the left (away from large pulley “E” and hold in place. (See Belt Tension below)
4. Tighten Bolts and Nuts (B) securely with a 1/2″ box wrench while maintaining tension on belt.
Belt Tension
- Press on the midpoint of the longest span with firm thumb pressure (about 5–7 lbs of force).
- The belt should deflect approximately 1/4 inch.
- The belt should not slip during normal screening.
- If it squeals briefly on startup or under load, tighten it just a little.
- If there is almost no deflection, it’s too tight and should be loosened.
Because the motor is only 1/3 HP, there is very little advantage to running a tight belt. The power required to drive the screens is low enough that a properly tensioned belt will transmit it easily. Overtightening only increases:
- Bearing load on the motor
- Bearing load on the driven shaft
- Heat
- Motor current draw
- The likelihood of premature bearing failure
The motor uses permanently lubricated ball bearings, so keeping belt tension reasonable is one of the best things you can do to maximize their service life. You are better off having to adjust the belt twice over its life than overtighten it once and unknowingly reduce the life of the motor bearings.
